Project Readiness Questions
- What are the strengths and weaknesses of your preferred site?
- What are the characteristics of your proposed solar project? System size? Installation type – roof, ground, or canopy?
- What are the characteristics of your proposed project site? What type of building or land is the project on? Who owns the building or land? What utility territory is the project in?
- Have you evaluated different system layouts, solar arrays, system sizes, and other important system inputs scenarios to determine solar production? What are your best options?
- What local zoning and permitting requirements apply to the preferred site? Is the site in a special taxation category that limits development?
Background
Project readiness starts with a “good” site. Siting determines project quality, cost, performance, utility connection, and community impacts. Comprehensive solar siting criteria must include technical, economic, environmental, and political considerations. As a developer, you will have to work through each of these critical factors to determine the quality of your site. Solar projects include different potential types of installs, including ground mounts, rooftop ballasts, carports, and other methods of incorporating solar infrastructure.
For more information on what makes for a good solar site, visit this website.
What Makes for a Good Solar Site?
Favorable Regulatory Context
We would be remiss if we did not state upfront that the highest-level determination of a good site is being located within a state and utility area with favorable community solar regulations. The 20 states that allow for third-party community solar ownership present the most fertile sites for community solar. Those with strong incentives for LMI community solar make it possible for developers to generate significant benefits that can be passed through the LMI communities. The first step is to determine the state and utility area in which your solar site is located and what is legal and allowable on that site.
Easy Access to Utility Connection
After site control, access to proper power connection is the next big factor determining site quality. Community solar facilities are small power plants. They generate power and feed it back into the existing power grid. As such, they must be connected to the power grid. This power connection is one of the most complicated and expensive aspects of developing solar. The availability and cost of a utility connection will make or break a project. When looking for utility connections, type of connection and distance from other utility lines are the key factors.
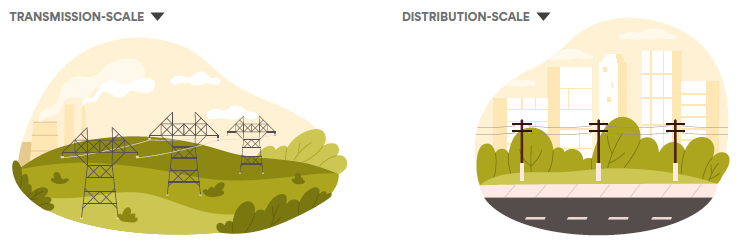
There are two primary types of projects: transmission- scale and distribution-scale. Transmission-scale projects are larger (i.e. sites of more than 200 acres) and need access to transmission lines, which are high voltage lines that are seen criss-crossing the country. For most of our work in community solar, we are developing distribution-scale projects, which are smaller (i.e. sites between 10-50 acres) and tie into smaller three-phase power lines, which are more common and run along neighborhood roads. When considering a site, project developers must find the nearest three-phase power connection. The other consideration is distance. The further the distance to the nearest power connection, the more equipment and labor required to make the connection, which can very quickly escalate project cost and make it infeasible.
Close Proximity to Substations
Substations are nodes in the utility grid that transition voltage (i.e. from high to low) and are required to manage the power generated from the solar facility so that it can be distributed to the rest of the homes in the area. A good rule of thumb: optimal sites need to be within 3 miles of these substations to minimize the distance the power needs to travel along the lines. The further out from a substation, the more likely that the powerlines cannot support the new power without investment in costly upgrades, which will most often be pushed onto the community solar developer.
Open, Flat Sites
After access to quality utility connection and substations, site grading is the next big factor determining site quality. Solar developments require flat, open land. So if land is forested and/or sloped even slightly, it is very expensive to remove the vegetation and change the angle of the land. Even relatively small slopes have major impacts on solar performance. As such, developers prefer flat, cleared land. The cost to clear and grade land can make or break a project. In some cases, a project can be profitable enough to justify clearing costs, but this issue must be considered early in the development process.
Zoning Favorable for Solar
Zoning requirements will have a major impact on solar development. Zoning specifies land use, location, and design. A good site allows solar development “by-right,” which means that the zoning of the site allows for solar development. If zoning is not allowed “by-right,” it is still possible to change the zoning to allow solar development. Yet, the zoning change process is costly and will make your project less feasible.
Community Supportive of Solar
Solar projects are quiet, do not generate any traffic, and generate new tax revenue for local communities. Yet, many local communities are resistant to any kind of change in the land use and sometimes have the power to block projects from being constructed. As a result, good sites are located in communities that are not resistant to solar development. Some rural communities have raised serious concerns about farmland being converted and lost due to solar development. To limit the loss of farmland, some local governments have banned solar on agricultural land, even as models of agrivoltaics are accelerating in effectiveness. If solar is not an allowable land use, developers will need to request a special exception to install community solar. The process for earning a special exception adds considerable cost and can take months. We recommend that developers engage early with local government staff and leaders to determine if solar is an allowable land use, and that they engage with community members to gauge support.
Site Control
Site control refers to the ability of the developer to secure legal rights to use the land for community solar. Having site control provides certainty and allows developers to make necessary investments in the project with confidence. There are several options for gaining site control, such as purchasing the land outright, entering into a long-term lease agreement with the landowner, or obtaining an easement or license from the landowner to use the land. Each option has its advantages and disadvantages, and the choice may depend on factors such as cost, duration, and flexibility. A “good site” is a site controlled by the solar developer or one where the solar developer has spoken to the owner and believes a path to site control is imminent.
Avoid Flood-prone Areas
Flood-prone sites and those in designated wetland areas are typically not suitable or even legal for solar generation. There are some exceptions here for rare and low-risk flood zones, but check local regulations to determine if you are allowed to construct solar. You can see if your property falls within a flood zone by visiting FEMA. Depending on the type of equipment you are installing and how deep you are digging into the soil, soil studies are sometimes required as well.
Positive Environmental Conditions
Good sites have favorable environmental conditions and pass environmental screens. Developers must ensure against potential environmental risks and ensure compliance with local, state, and federal regulations. Good sites have good soil and water quality and are not identified as endangered species habitat, wetlands, or floodplains. Additionally, developers may need to evaluate sites’ potential impact on air and water quality, noise levels, and waste management. These tests are often relatively expensive and are addressed after site control is secured and the other indicators above of a good site have been confirmed.
Promoting Resiliency
Resilience is one of NCSP’s meaningful benefits. The American Institute of Architects defines Resilience as “the ability of a system and its component parts to anticipate, absorb, accommodate, or recover from the effects of a hazardous event in a timely and efficient manner, including through ensuring the preservation, restoration, or improvement of its essential basic structures and functions.” Some common forms of resilience in community solar projects are improved electric reliability and reduced risk of disruption during emergencies. Below are some ways in which we can site projects to enhance their resilience:
- Site selection: Siting projects in areas with low risk of natural disasters, such as floods or wildfires, minimizes the risk of power outages.
- Energy storage: Adding energy storage to projects, such as batteries or pumped hydro storage, enables them to store energy and operate when the utility grid is out.
- Microgrids: Incorporating your community solar project with microgrid infrastructure provides a completely self-contained power system that can operate independently of the larger grid during an outage.
- Solar back-up generation: Selecting sites close to critical facilities, such as hospitals or emergency response centers, can help ensure that power is available to those facilities during grid outages.
- Redundancy: Siting your community solar project in a location with redundant power connections can help ensure that power is available during an outage. This can include connecting the project to multiple power grids or ensuring that there are multiple sources of power available.
Action Items
- Based on your current knowledge, create an exhaustive list of potential sites for community solar in your jurisdiction. Watch this video to learn more.
- Your list should include enough information about your potential sites that you can compare site quality and understand which ones will be best suited for your project.
- To learn more about community solar siting, view this PowerPoint presentation on solar project siting from the NCSP Municipal Utility Working Group.
- Get an aerial view of properties using resources such as Google Maps and Project Sunroof.
- Site conditions: Investigate the characteristics of the site, use the qualities of a good site noted above and this checklist. You can also use this tool as part of your site screening.
- Research zoning and permitting requirements: These will help you better understand interconnection possibilities. Learn more here. Clarify who owns the property: Assessor records, plat maps, site plans, and other maps and documents can clarify which jurisdiction has authority over land development on a site. Make sure that you believe that you can work with the site owner or local stakeholder to get site control.
- Community Consideration: What type of stakeholder engagement might be required with current property holders? Refer to chapter 4 to learn more about community engagement in community solar.
- Watch System layouts and production.
- These tools will tell you the expected amount of energy production in a year. This prediction is based on the design specifications input into the system, and the predicted sunlight and weather conditions at this location. Record the predicted kWh/year for this project. Experiment with different specifications
- Repeat steps as many times as desired to try new combinations of design details.
- Remember to stay within the regulations and what is feasible for your proposed project.
- Are there certain specifications that could improve the production levels of your solar array?
- Determine power value. Power value is the true value of the electricity produced by the solar panels that takes into consideration the unique factors of solar energy production to determine an acceptable market value that benefits both residents and utilities. It varies by state and utility. If you are providing power on site behind the meter, review site utility bills to determine the value of energy savings from solar. If you are providing power in front of the meter, which is typical in community solar applications, call your local utility to learn the value of the power at the site.
- Conduct a physical site visit. Physically visit and walk around the site to verify your assumptions and ensure that you have not missed any important landmarks or features of the site.
| PVWATTS Calculator | Helioscope | Aurora Solar |
|---|---|---|
|
|
|
Moving Forward: If the site is adequate, the next step is permitting. See document samples here.
Eyes on Equity
Historically, solar adoption has not been equal across all households and communities–skewing toward communities with higher incomes and higher populations of White and Asian residents. Consider how our community solar siting decisions impact equity.
- When building your lists of priority sites, you can use the Department of Energy’s Low-Income Energy Affordability Data (LEAD) Tool and the Climate and Economic Justice Screening Tool (CEJST) to explore which communities have the highest energy burden, and, ultimately, need the most support.
- Partnering with affordable housing owners to serve residents and site projects on their properties is another great way to ensure that you are reaching those in need because the affordable housing residents have already been income-qualified. The U.S. Department of Housing and Urban Development created a Renewable Energy Toolkit to better explain this process.
- Historically, polluting facilities were pushed into LMI communities because they had the smallest political influence to fight back against the facilities. When siting your project in an LMI community to serve those in need, you can ensure equity by not pushing any new potentially negative impacts onto the community–such as noise or dust during construction, visual and aesthetic impacts, or other concerns.
Additional Resources
- Renew300 program: to provide renewable energy on subsidized housing properties.
- Estimating Rooftop Suitability for PV: A Review of Methods, Patents, and Validation Techniques: For researchers looking to understand the market potential of rooftop-installed photovoltaics (PV). Understanding the amount and characteristics of rooftop space that is available for installing PV is essential.
- Solar Development on Public Facilities, Brownfields, and Under-Utilized Land: This section of the SolSmart program’s Toolkit for Local Governments provides information on how to install solar energy systems on public facilities and lands.